Adventures in HF: Part 2
DIYTechnologyAmateur RadioHOAs, EFHWs, and toilet-based electrical interference!
My last post covered the setup for HF radio - check it out.
This one is going deeper into the antenna setup and the actual day to day of HF. Think stringing wire and using volume to dial in a contact. This is the really fun (or irritating) part of HF, and it’s filled with just as many personalities, quirks, and undocumented steps as the rest!
More about that antennaI mentioned last time that I picked an End Fed Half Wave (EFHW) antenna for my HOA driven setup. This type of antenna is great for HF, but is typically strung horizontally between trees or from a roofline to a tree. But you can also cram them in an attic if you have the space and a lot of patience. While there are other good choices for the attic such as dipoles or loops, the EFHW I picked on a bad day gives you coverage across your workhorse bands - from 75m to 10m. Practically speaking, folding it into an attic compromises your range, directionality, and realistic band usage, but I’ve had no issue making this setup work for workhorse bands like 40m, 20m, and 17m. I’ve even had great luck down to 10m. Most places online will tell you to “never go with an attic antenna” because of the limits, but if you have to, and you have a long attic run, they’re great.
I picked the MyAntennas EFHW-7510-1K-ICAS. For a 100W radio and for the bands I wanted to cover, this was the natural choice. They have other antennas - some cheaper and more narrowly focused on a few key bands and some ready for your 1.5kW setup. Sniff around for what you’re most likely to use and benefit from. Ultimately, you’re going to be out about $150, and it’s money very well spent. MyAntennas are handmade, come with a great prewound transformer, and typically require no tuner. You can also DIY these, and that’s going to be far cheaper if you’re so inclined. This brand is just awesome - they even shut down for long vacations frequently, and take support and quality really personally. You should have no problem supporting them.
What arrived was a tidy loop of 130’ of wire, a transformer box, and instructions for the proper use - hanging it from a tree. Before you do anything else though, you’ll need to run a feed line of coax from your radio/shack up to the attic. Remember that you want the shortest run of feed line going to the radio as possible, so do not just put a few hundred feet of coax up there. You need to be smart about where this goes, drill the holes, and run the wire before you start thinking antenna. This is the harder part, and you don’t want to install the antenna and find out it demands 100’ of wire creating extra loss before you can hook up. This is wildly fun (ugh) - lots of navigating headers, finding where you are in a room by yelling, drilling through the ceiling by accident, and finally fishing wire around dense insulation. You’ll wind up with a run of wire showing about 4-5ft on the radio side and maybe 10ft on the attic side - enough to absorb mistakes.
This is also a good time to talk about impedance and connectors. Your coax will come with an impedance rating in ohms (usually 50 ohms for RF). If you’re trying to do this with the coax plugging into your TV, stop and buy real RF cable. This is a property of each cable and connector that helps you measure how effective it is at carrying RF energy. Big proxy for “how much of my signal is going to reach the world vs dissipate out.” A common failure point is impedance mismatch - using connectors or lines with different impedance values. While this won’t make the system fail, it does lead to more noise and loss. To avoid it, just order RF-ready cables with the connectors you need - usually PL-259. Inserting a bunch of random connectors to put spare cables together will work, but this adds room for potential impedance mismatch, loose connections, and water ingress. You’re already up in the attic stringing a $200 antenna for a $1000 radio - why skimp now?
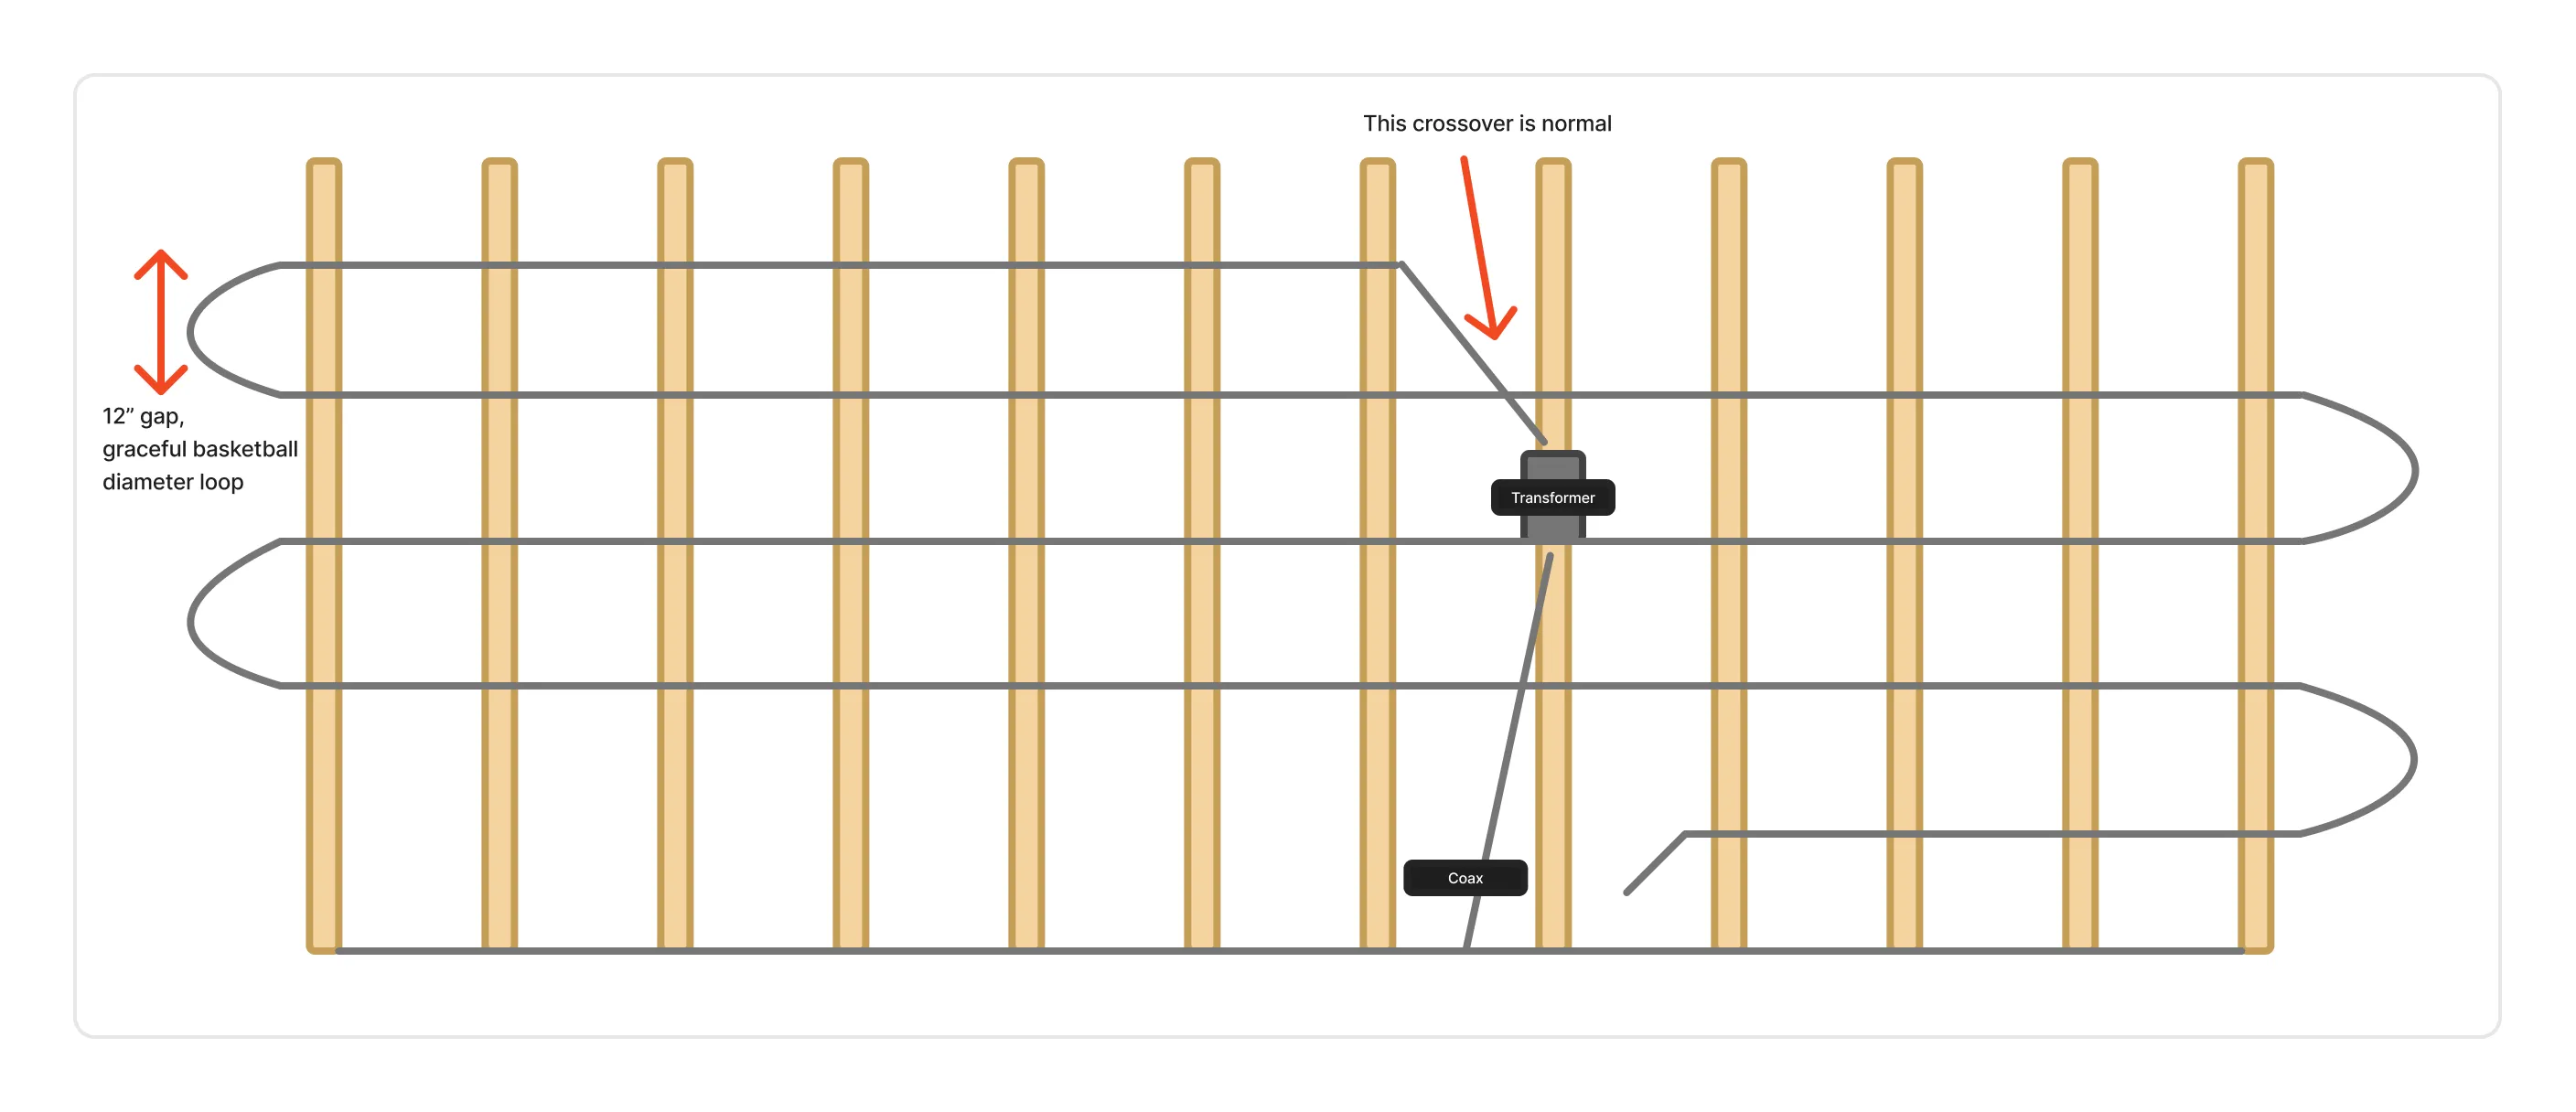
Now back to the antenna - as great as the EFHW is, they do not include instructions for attic installation, and the pattern continues online. While many people have installed attic EFHWs, few have documented it in a way you can follow. I’m here to break that! Behold, the diagram you want:
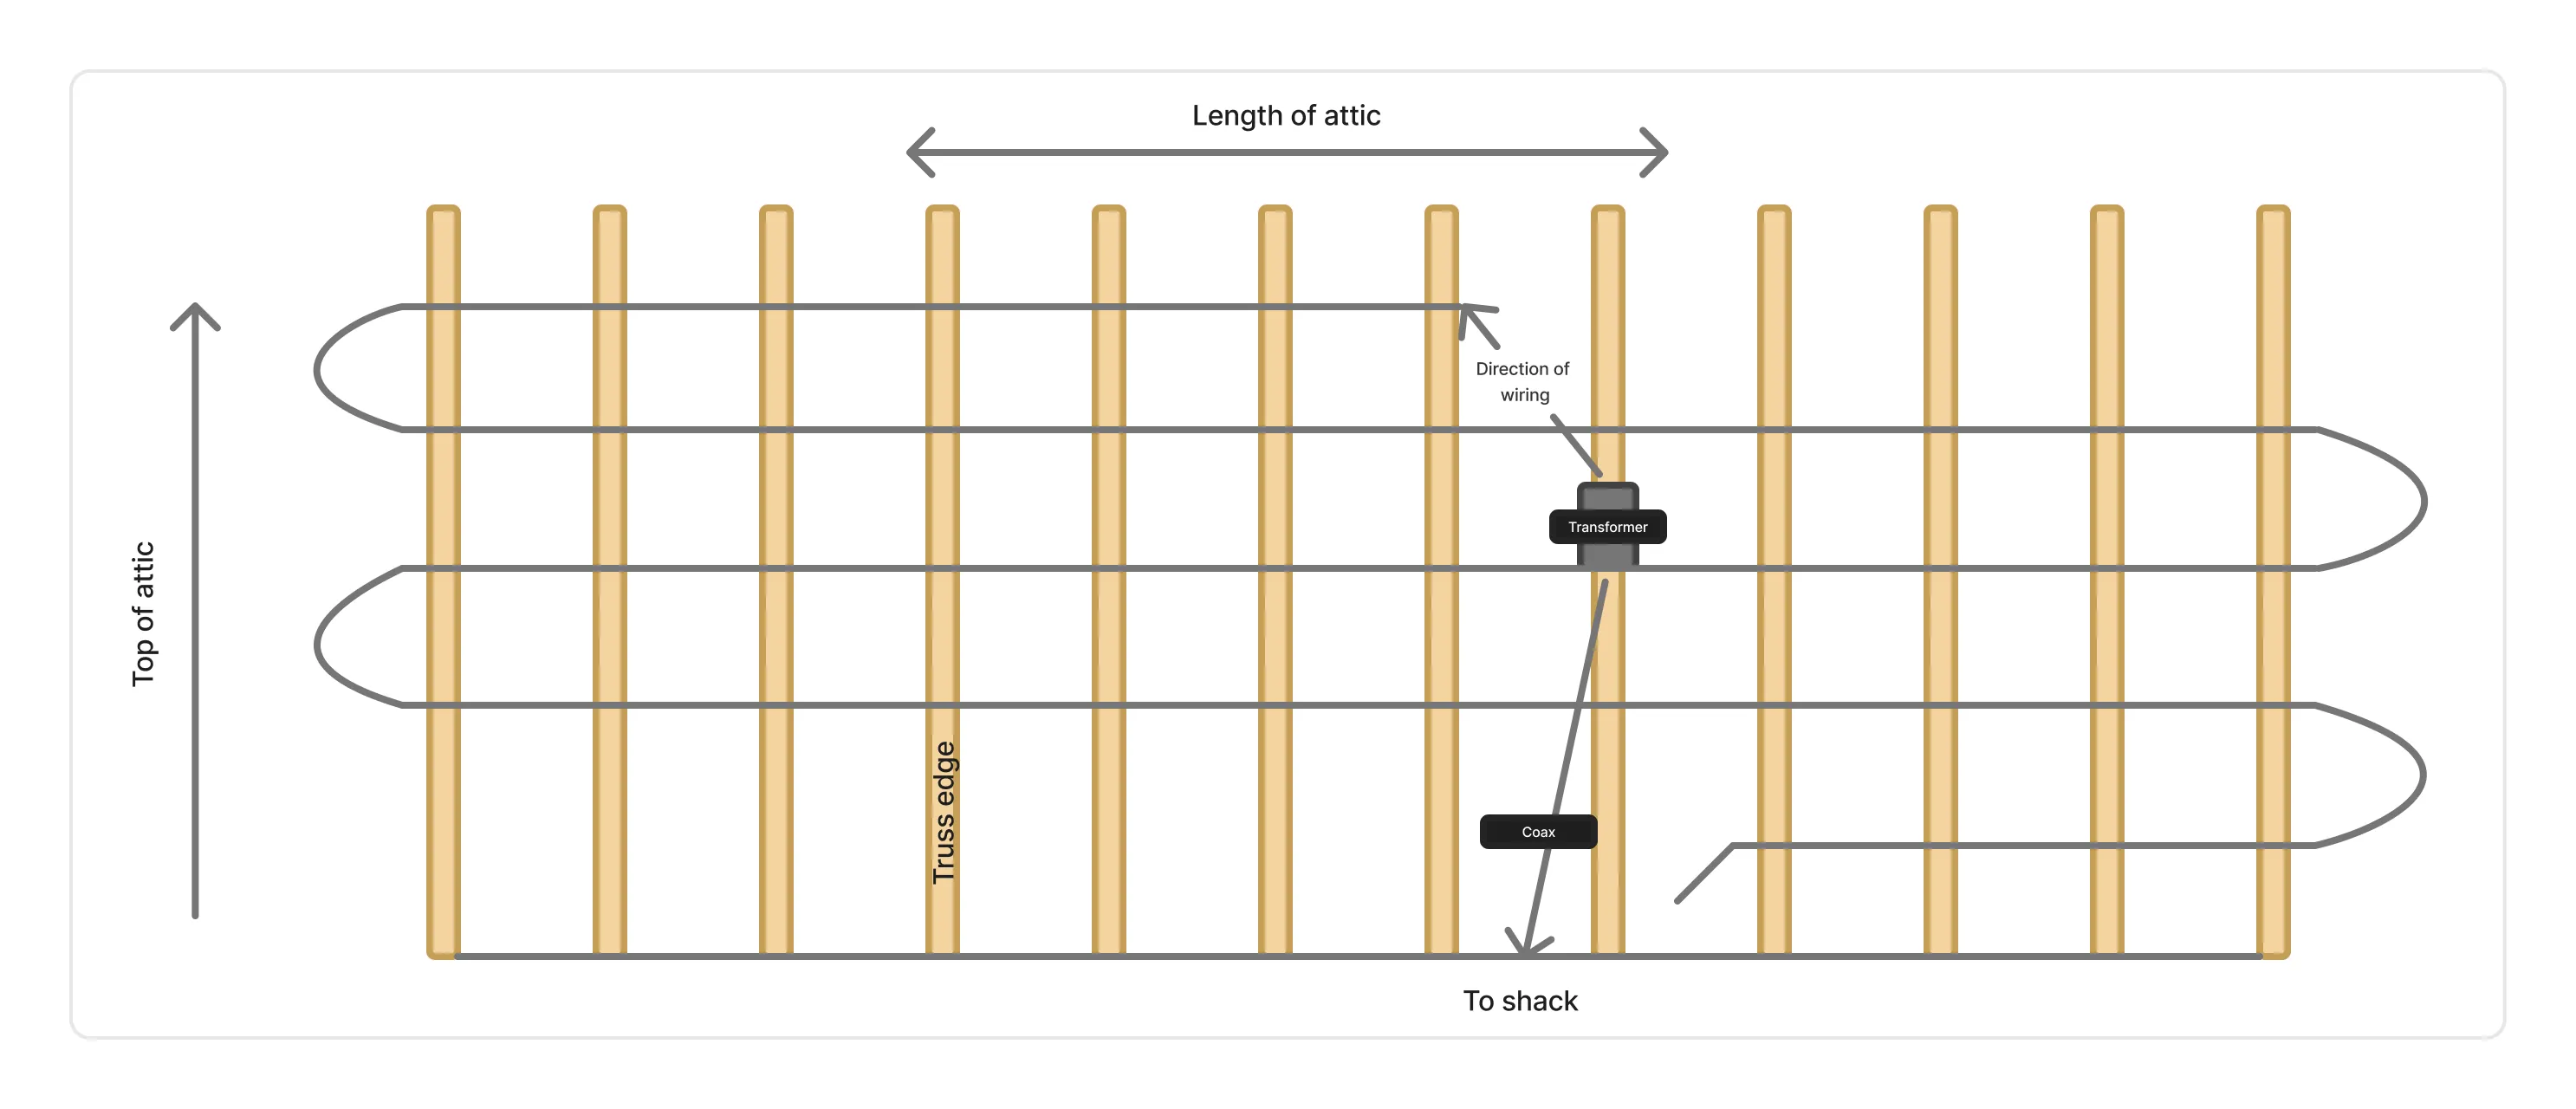
What you have here is a view of how your attic will look with the EFHW installed along the ridge line, orthogonal to the trusses (stay with me). In laymen’s (my) terms, this is the length part of the attic, not the width part where you’re staring at trusses head on. Imagine you go up to your attic. Turn so that straight ahead, you see a sloping roof where your feed line comes up. To your left and right you should see the length of the attic - the section you can hopefully walk down. If you turned around, you’d face the opposite slope of your roof.
The trick here is that the antenna is strung along this ridge view, starting from wherever your feed wire enters the attic. In my case, the feed line came in roughly in the midpoint, right across from my access. So I started in the middle. To actually string the wire, you want to offset it from the wood trusses and with an insulator. That sounds expensive. Guess what - you can just head to Tractor Supply and snag cheap bags of electric fence screw-in insulators that are made to do exactly this! They put an inch of plastic between the wood and wire, and have a nice little loop to hold your wire up. Most even come with a drill insert to make screwing them in easy. You can skip this step, but don’t - putting these directly on the wood is a slight fire risk especially in high power digital modes, and performance will take a big hit.
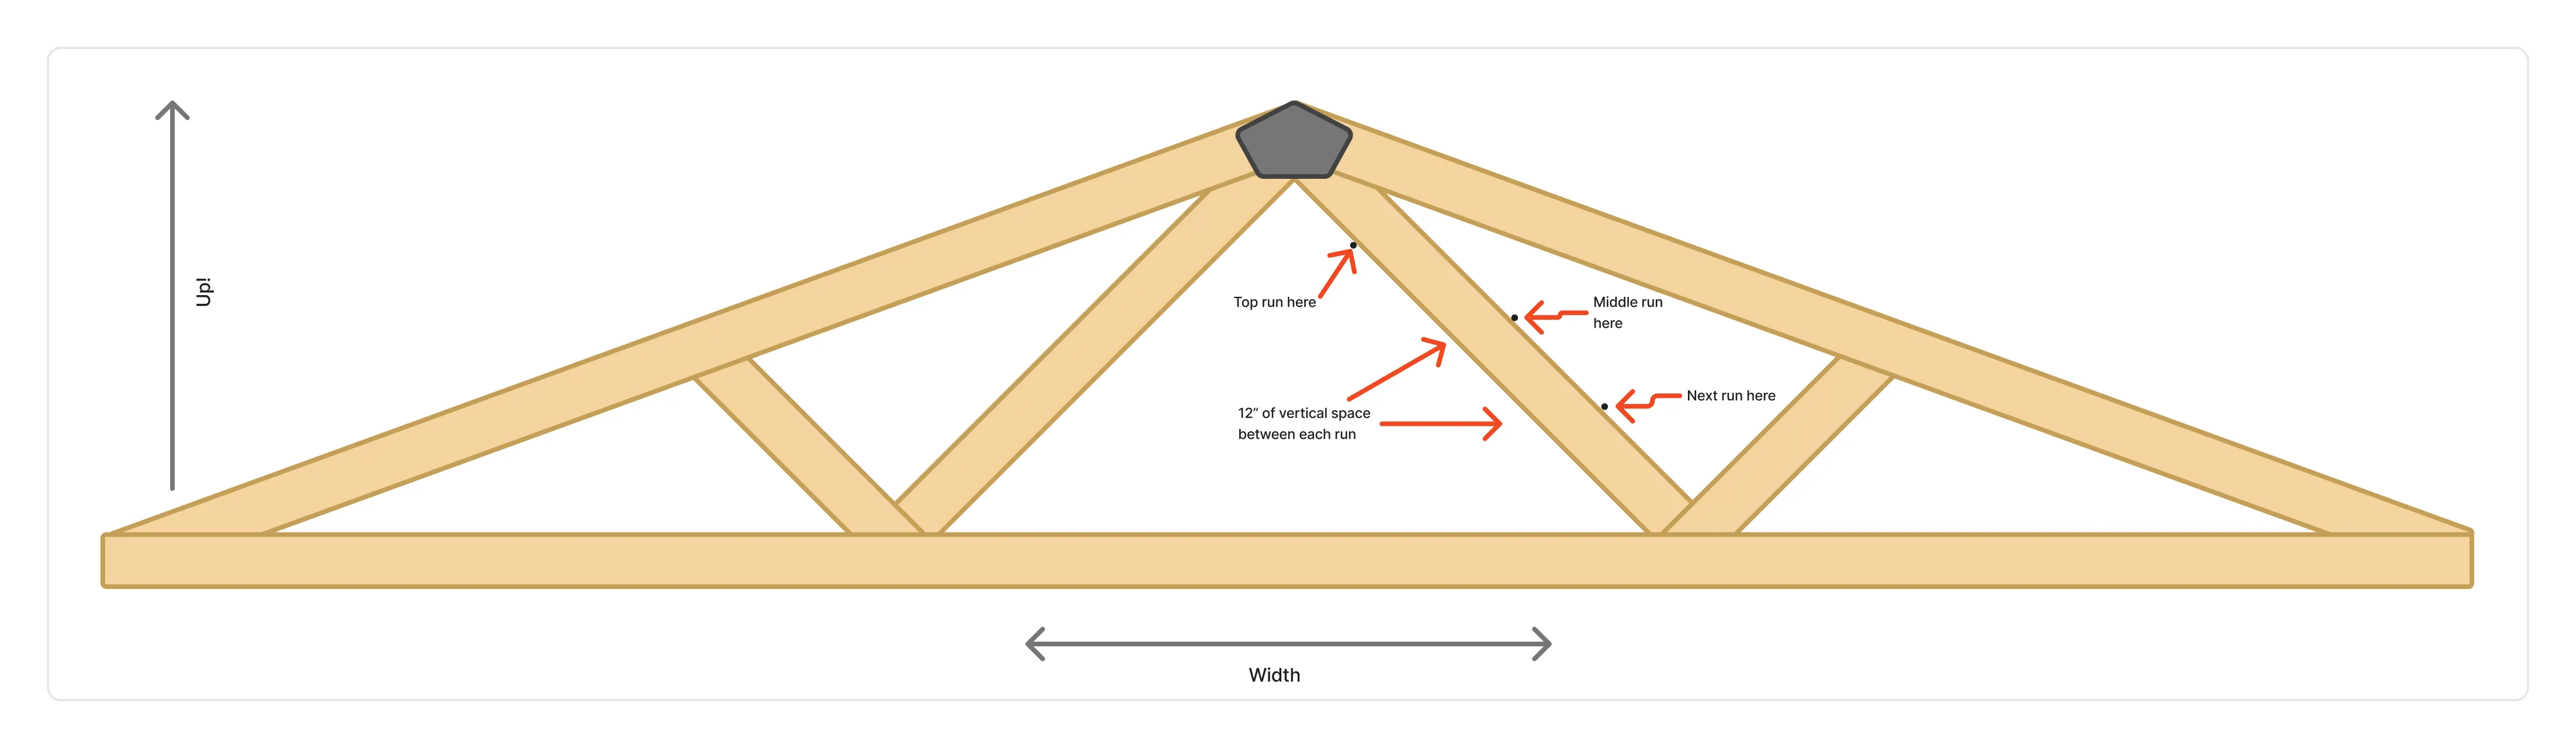
Once you’ve found the right position, installation is really simple. Mount the transformer box to a truss face, then run the antenna wire up and about 10-12” below the ridge line (the peak of the roof lengthwise). It’ll form a diagonal line upward - this is normal. Once you hit the height you want, drill in your wire insulators at that height on the diagonal truss face all the way down the run of the attic. What does “truss face” mean? Imagine you’re looking at a 2x4 edge - the 1.5” part. That’s the face here, and you’re just screwing in these insulators in a horizontal line about 12” down from the peak of the roof smack in the middle of the edge.
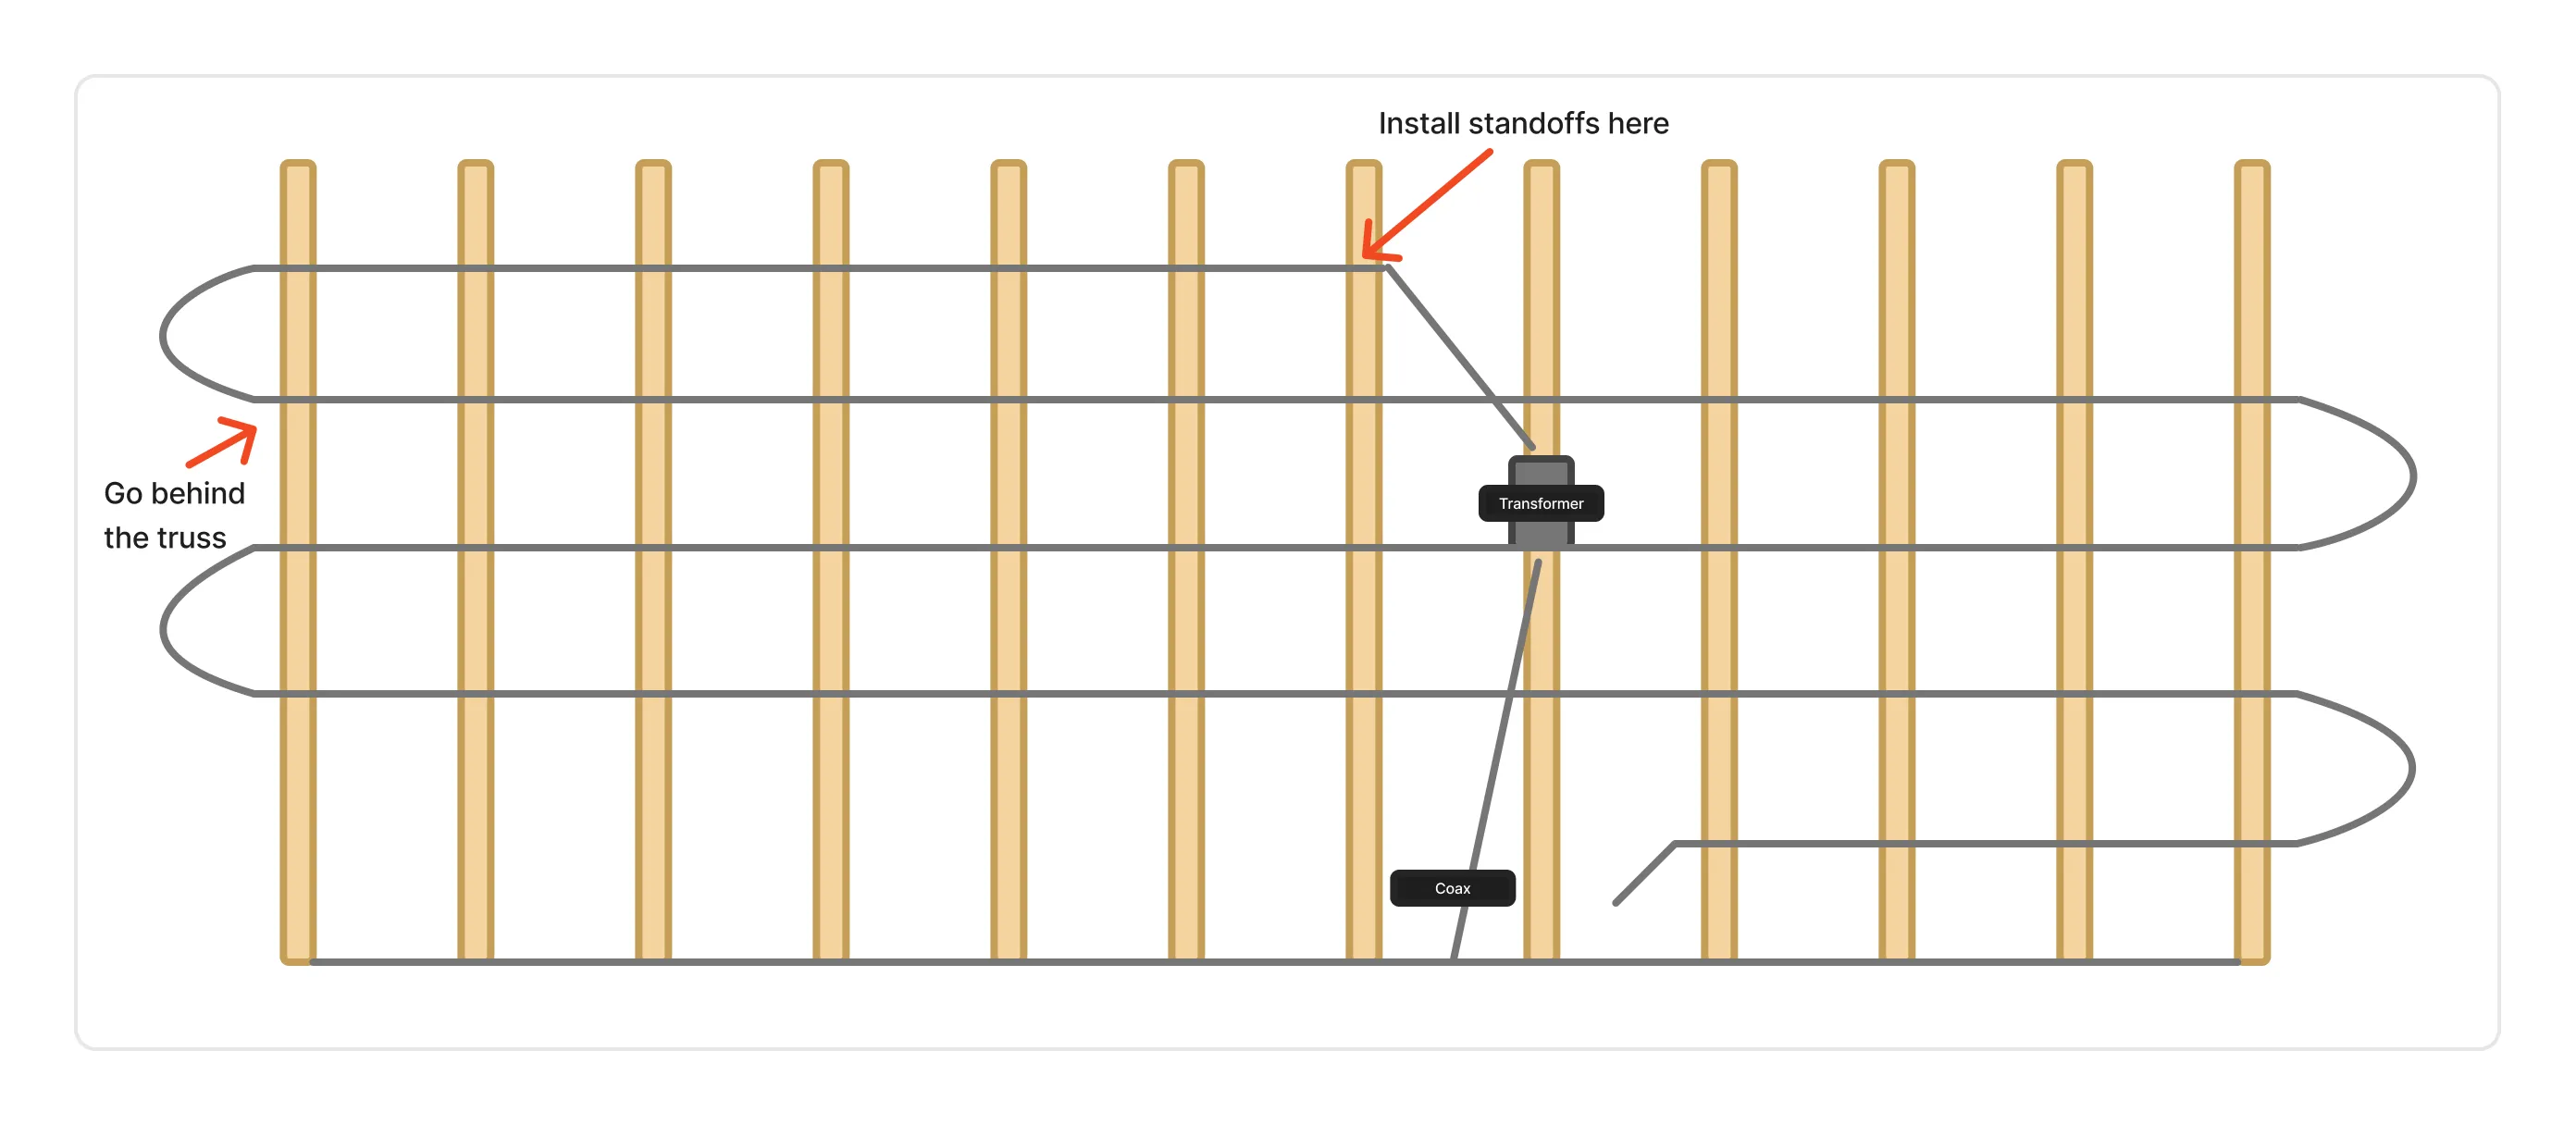
When you get to the end of the attic, drop down about 12” vertically (i.e. measure straight up and down, not down the diagonal of the truss), move to the inside of the truss face (opposite the edge you just used), and run another row of insulators straight down the entire length of the attic exactly parallel to the first run. You will cross over your antenna wire running out of the transformer at some point here - that’s expected and non-impactful as long as you cross it at a roughly 90 degree angle. If you hit the end of the opposite side of the attic, loop again, staying on the inside of the truss for the rest.
If you remember back to the antenna photo from the attic, this will now all make sense:
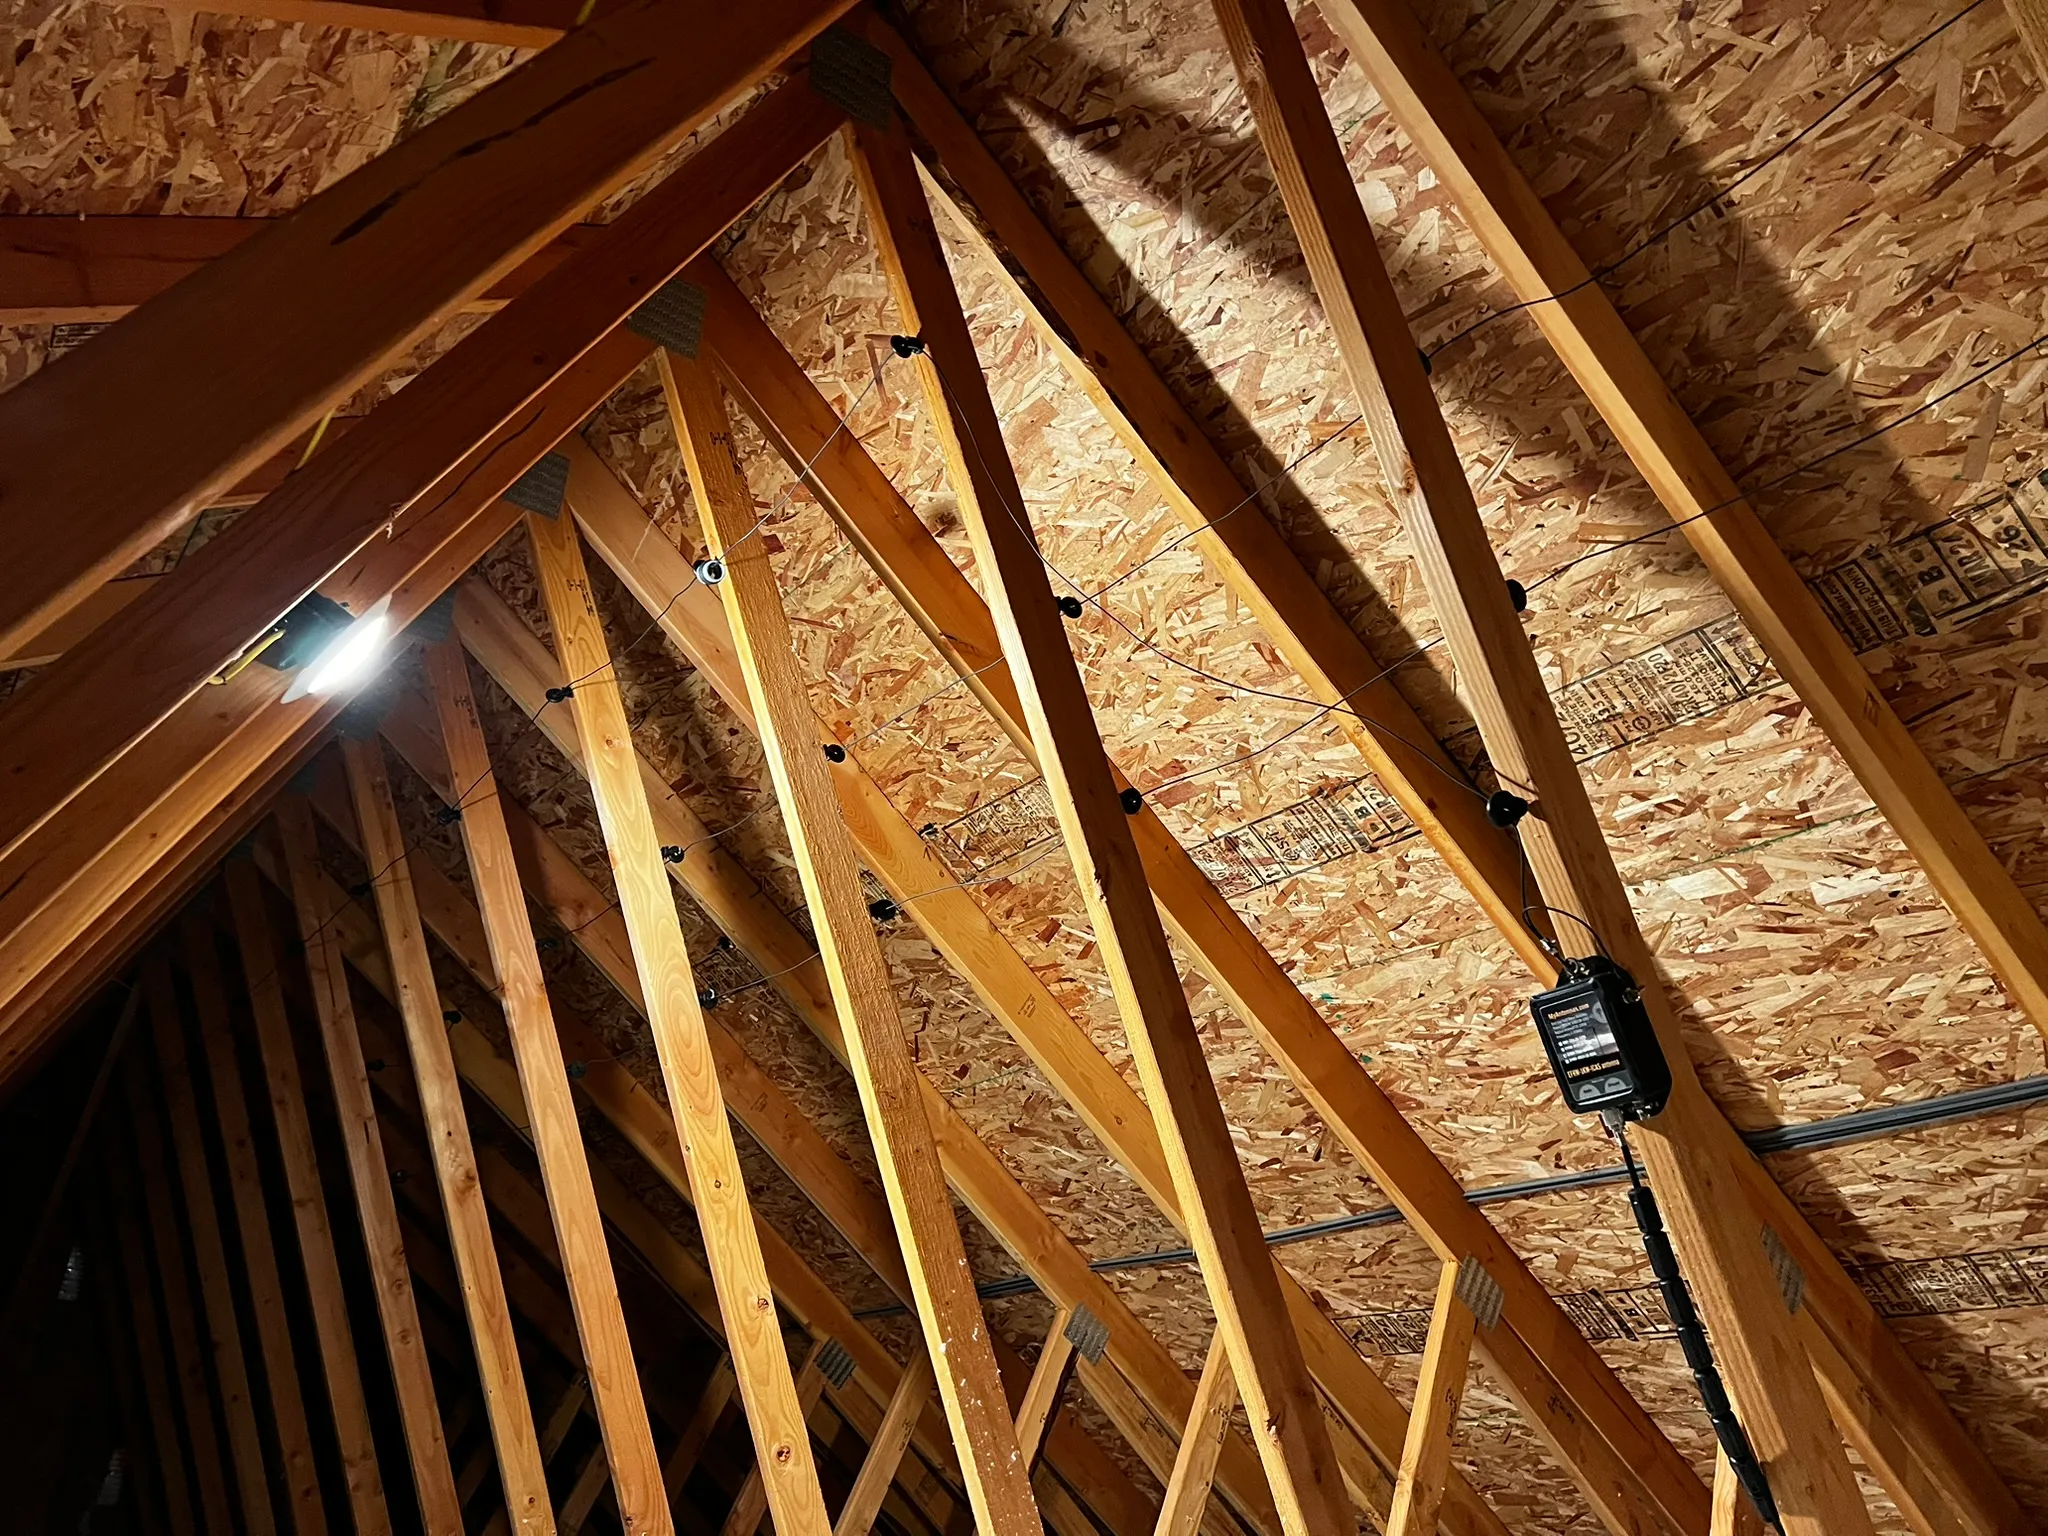
Next, just hang the wire! You want the wire loose, not tight between insulators, and you want to ensure components like the PVC knob near the end and the little circuit board stay hanging in the air. The one trick is what to do at the end of a run - you want to loop the wire down to the next run by making a gentle, wide, roughly basketball diameter half loop before continuing the run. You’ll end with a length of wire dangling vertically at the very end and that’s expected. You can ground this if you want, and radials or a counterpoise are not required.
If you want to see it truss head on, here’s that.
So your antenna is up, and you’re done, right? Not so fast - remember that we’re in a house, and houses have a lot of interference. Not only are you contending with things like ducting and roofing materials, but you need to worry about wiring, electrically bonded pipes, and even noisy LED controllers. The modern technological world is out to get you, and you need to fight the noise it creates!
Noise is a natural part of radio - radio is just picking up the right noises over the wrong ones, after all! These noises from your home are natural, worse if it’s a new build, and way worse if you have an attic-mounted antenna. These noises are the enemy as well - they surface as static that can outright prevent you from hearing people.
As soon as I plugged in my radio, I heard deafening noise on every band. Remember when I said the antenna requires no tuning? It still does, and my radio had a built in tuner. Yours may not, and that’s something to buy. After tuning, I ended up with an antenna with a Standing Wave Ratio (SWR) of 1.5:1 - great! SWR is a good proxy for how much of your transmit power is actually reaching and radiating out of your antenna. Closer ratios are better - below 1.5 is excellent. I moved to tweaking and adjusting volume, the preamp, and high/low pass filters to better hear contacts. I was ultimately able to get the noise floor (basically how much background noise there is) to a tolerable but horrible level - think a low roar, not a deafening roar. Functionally, I could just make out voices, but only just - most conversation was lost to noise. This was a problem in a hobby designed around hearing people.
It got even more wild as I went. Turns out a lot of new builds have an issue where the pipes of the home can end up grounded alongside your wiring, which means things that happen in these pipes can show up as RF interference. I chalk it up to PEX and lots of metal strapping. Net for me, it means that if the washer fills or someone flushes, a tsunami of noise hits every band for 30 seconds, painfully reminding you of why attic antennas can be less than ideal. What is actually happening here is more complex than “they share a ground,” but these big “rushing water” events lead me to turn off the radio and shake my fist at the HF gods. It also means the best time to get on the radio is when the house is empty, nobody is flushing, and I can shut off the power.
You can’t cure this. You can hunt down noisy LED drivers or plugs, but noise is a part of radio and the fix is to move your antenna outside. If, like me, you cannot do that, there is another trick - a choke. While I was using clip-on ferrite chokes already, these barely did anything. You can also make or buy a “common-mode filter” or choke that is installed inline, essentially killing much of the interference before it reaches your radio. MyAntennas also makes chokes, and I picked up the CMC-154S-3K 1-54MHz , a great, affordable choke that pairs nicely with my antenna. Installing this is actually easy - you put it between the transformer and your feed line using a patch cable, and use conduit straps to lock it down.
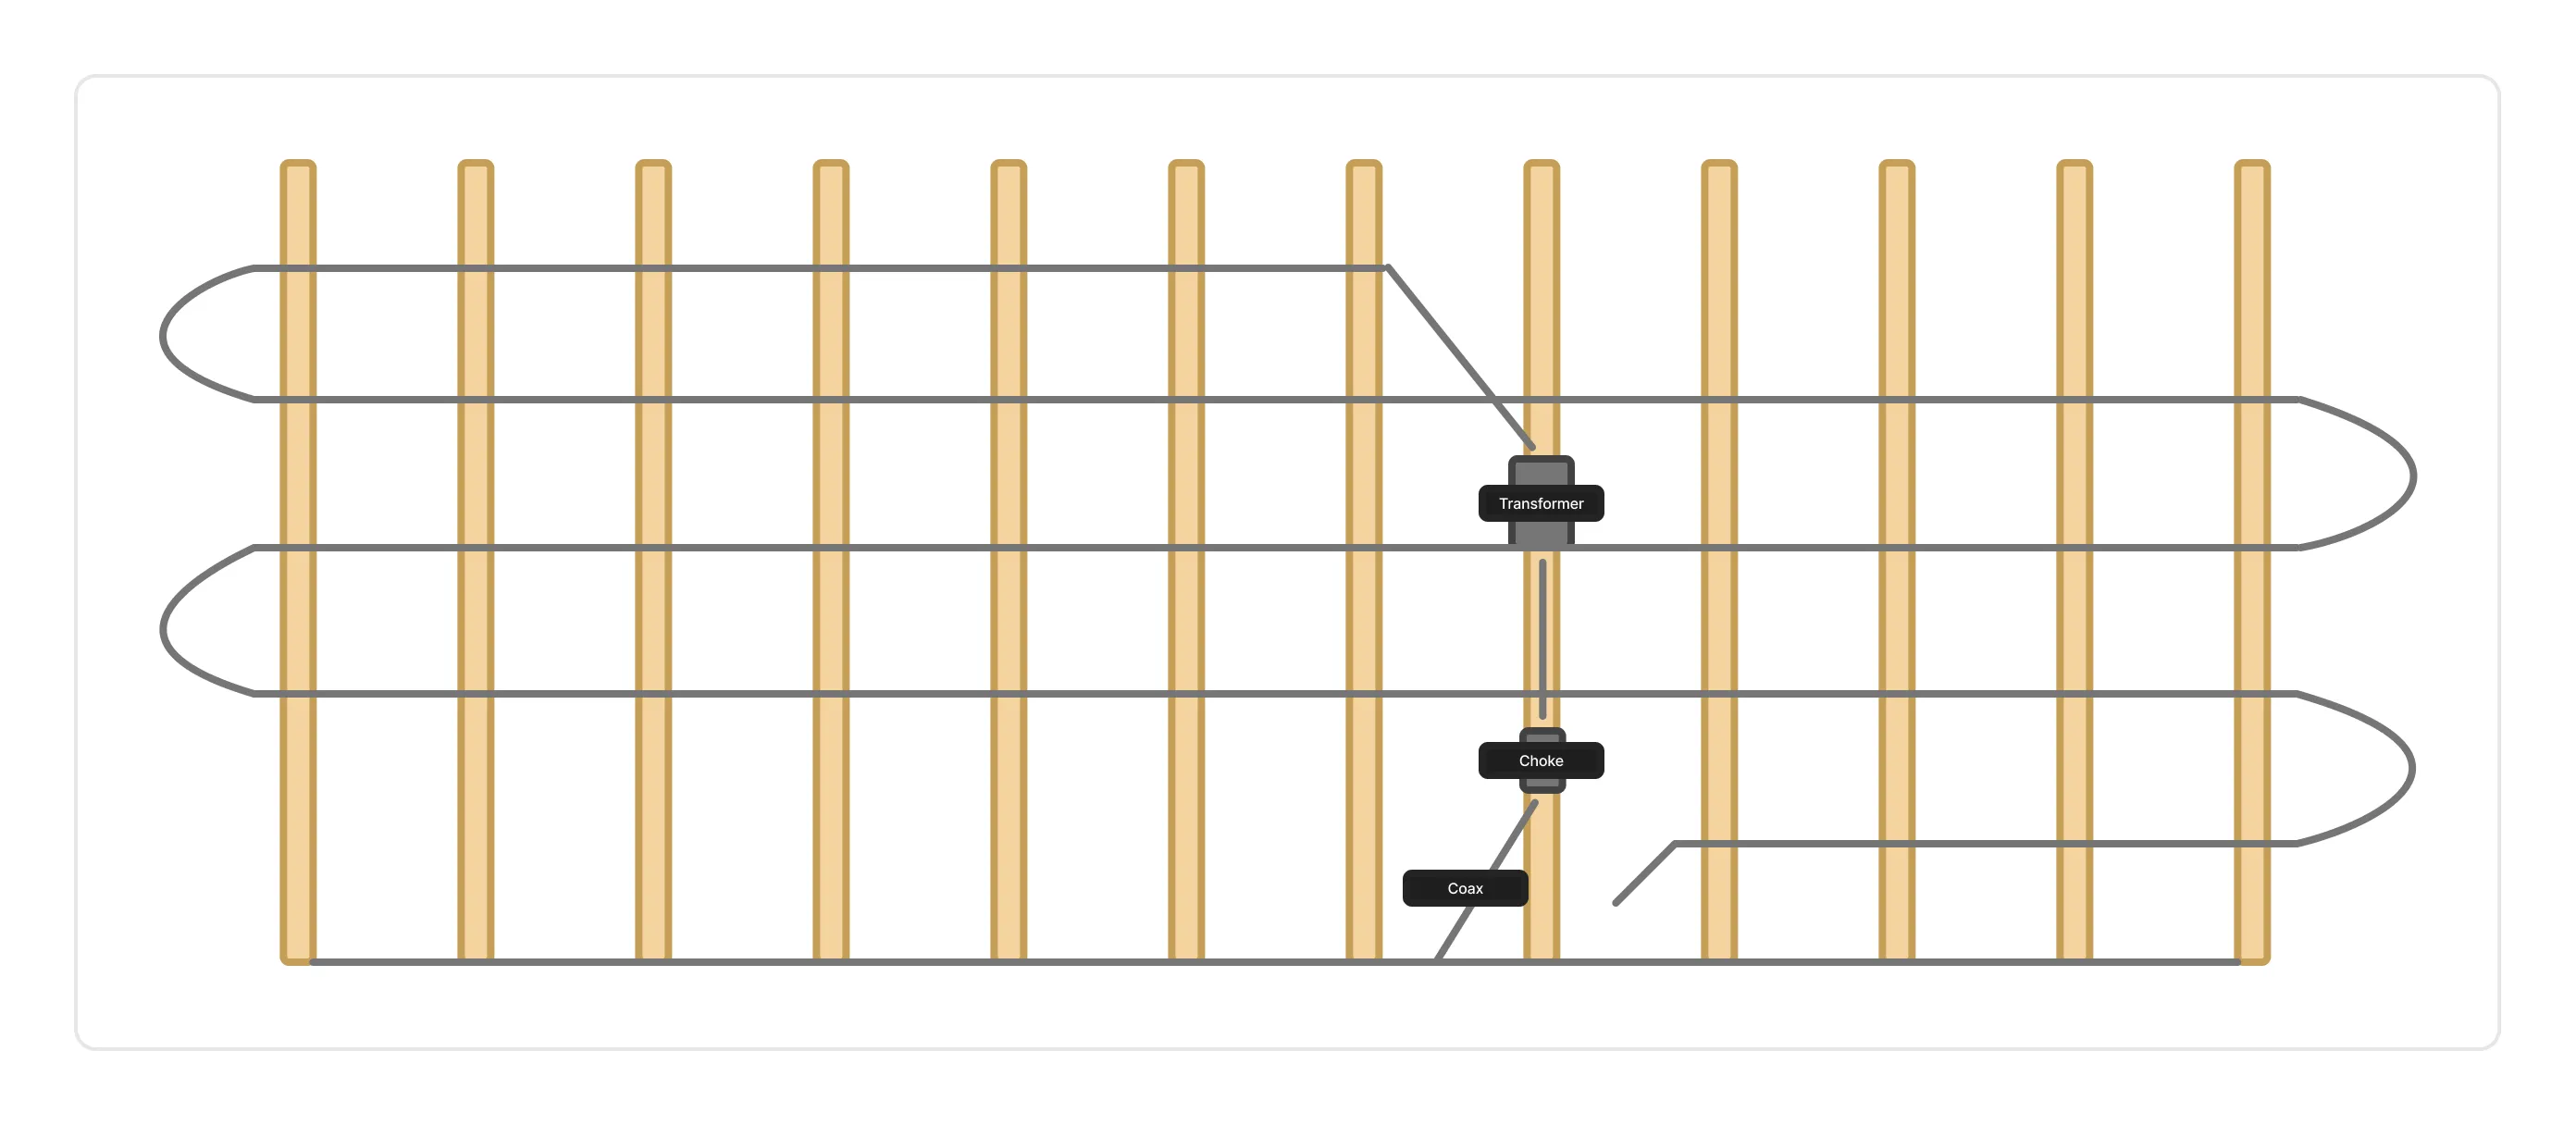
Some people knock chokes, some people swear by them. I’m in the latter camp - the only reason I can really use my radio in this configuration is due to the choke! Instead of a few barely useable bands, my noise floor was reduced by half (don’t shoot me logarithmic gods; it’s 3-4 S units) and I can hear and participate in conversations that were previously impossible. It’s not perfect, and it’s not even as good as a worse antenna outdoors, but it’s really serviceable.
Hey is this safe?Let’s put one thing upfront - is stringing a bunch of wire in your attic and then pushing 100w into it safe? Yes - it’s incredibly safe if done correctly. While it can feel odd to do this type of work without an electrician, remember the essentials: you’re using relatively very little power, you’ve insulated your wires from the trusses, radiated heat is essentially nonexistent at your power level, and power is reaching the antenna in short bursts each broadcast (basically as fast as you can say “Hey CALLSIGN I have you coming into Montana at about a 5x5”). There are situations that can make this unsafe, like failing to ground an outdoor antenna (we’re indoors), accidentally slicing electrical wires during install, or using high power digital modes nonstop which can radiate a lot of heat. But your day to day voice transmissions probably aren’t going to spark a fire. But be cautious and think through the risks - sometimes it’s better to just ground or just do a second inspection to rule out a risk. No warranties, whatever you do is your problem.
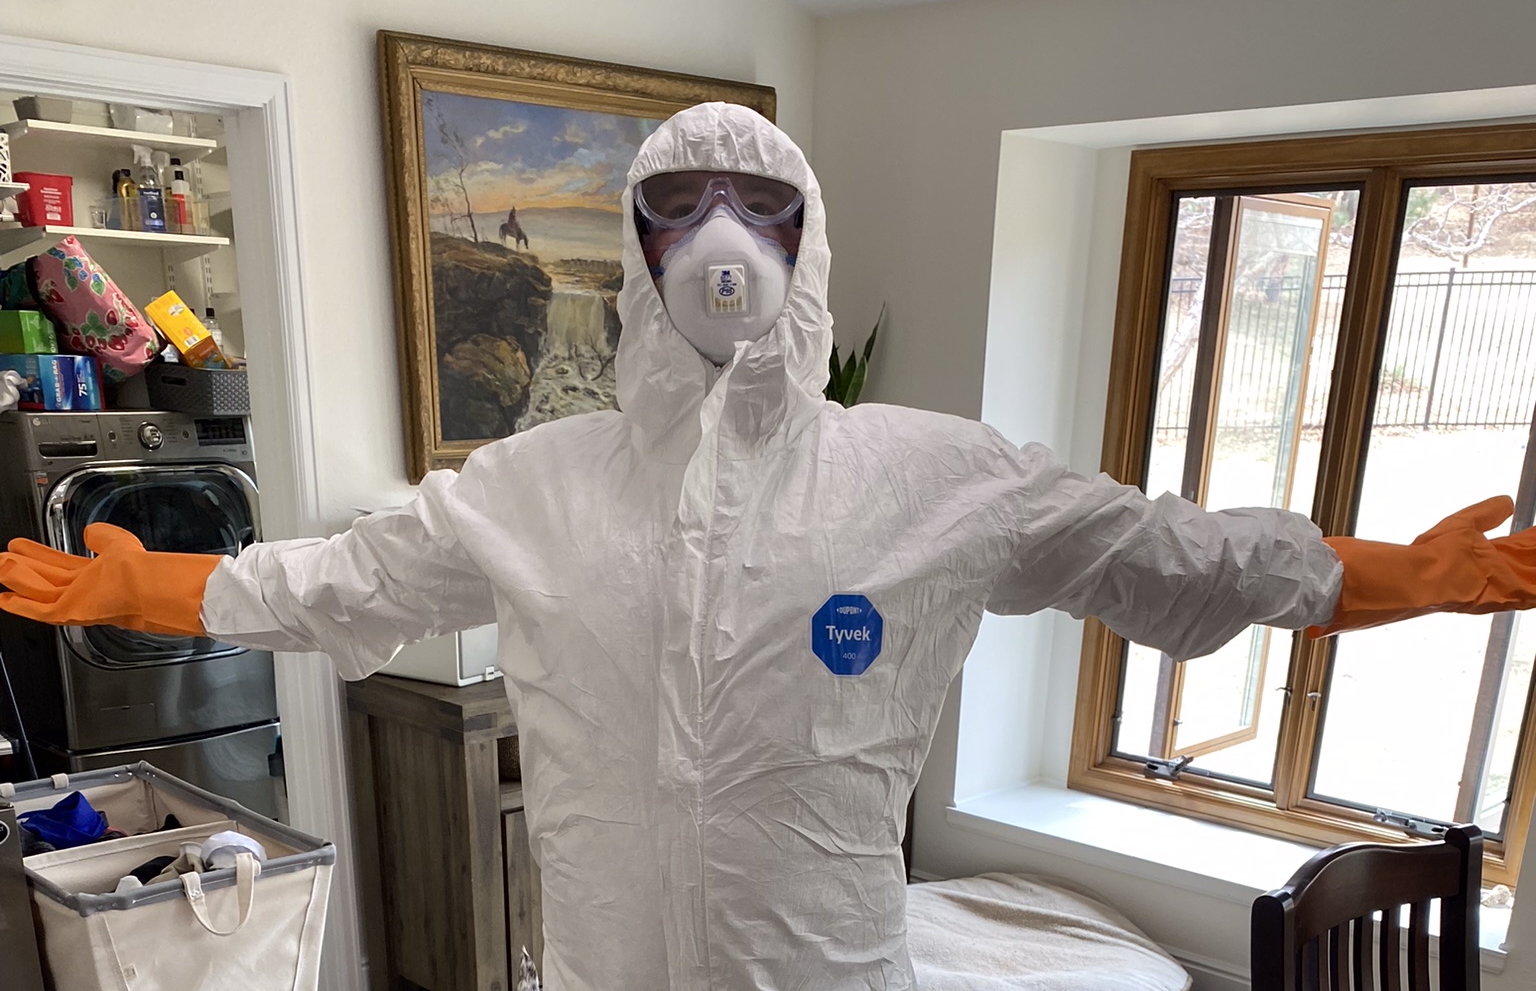
Also, please just wear a Tyvek suit and a respirator. My attic has a layer of new, clean blown-in cellulose insulation. Yours is probably that or old, ratty fiberglass packed with mold, mouse droppings, and…literal fiberglass. I never get lazy here - I just eat the $20, put on the suit and respirator and goggles before I go in the attic, and avoid feeling like shit days afterward. Don’t just go up in shorts because your contractor would. You will end up with fiberglass on your skin and coughing up black dust for a day.
Bands, convention, and anglesBands are volatile beasts. Whether a band is “open” (useable) or not is a factor of time of day, atmospheric conditions, and literally your exact location. That means a band can be closed for you, open for your neighbors a state away, and extremely active across the world. Sites exist to track band conditions, and they’re useful for forming a general sense of what’s open, but they’re not useful for figuring out your band conditions. Instead, it’s best to tune to the bands you care about and scan, seeing what you can hear and from where. Or if you have a fancy waterfall display, use that.
Bands open to you, as I shared, also depend on your license. But even within those restrictions, bands have convention and norms for how they are used. Guidance can ultimately be found in your country’s “band plan,” which determines what operations you can do on which frequencies within specific bands. For example, on 40m between 7.000 and 7.125 MHz and depending on your license, you can only use CW (Morse code), RTTY, or data modes, while 7.125-7.300 MHz are open to voice. As a General, I can’t even use 7.125-7.175 MHz. And even then how you interact with these bands in voice mode has its own convention - there’s strong convention that you use Lower Sideband (LSB) on 160m, 80m, and 40m and Upper Sideband (USB) on bands like 20m, 17m, and 15m. Except we skipped 60m - which breaks convention and uses USB! If you’re in the wrong mode, you hear garbled speech and nobody can hear you correctly. And even how you hear the pitch as you scan bands in each mode changes, and you’ll tune a station differently as you move between say 20m and 40m. It comes with practice and muscle memory, but you’ll learn little tricks like scanning up frequencies on USB and down frequencies on LSB.
Inevitably, you will get this wrong on the air. It’s not a big deal, and everyone knows what’s happening. Catch it, adjust, and move on. Do not feel like you need to apologize a bunch or overreact, especially during a contest or during a normal contact. Just pause, say it correctly, and move on. Likewise, you’ll need to be aware of frequency shift, where there’s a skew between the frequency someone is broadcasting on and the frequency you receive. You’ll often need to do fine-grained tuning to dial in a natural receive voice. I find this happens most often for me when listening to South American stations because of my location. You’ll tune to an odd frequency like 14.24975 MHz and hear normal voices, and you have to just know they’re likely actually broadcasting on 14.25000 MHz. Humans are creatures of habit, and they love whole numbers or even divisions. This extends to radio - people are usually broadcasting on frequencies ending in 00, 25, or other even slices.
Angles are also really fun with the EFHW in the attic. EFHW wire is pretty much omnidirectional (minus some null areas at the ends and along the components), but remember that you didn’t just cram the antenna in a horizontal line in your attic. You wove it through your trusses like a mouse fighting to escape a maze. Net, your antenna is packed with little folds, bends, horizontal/vertical sides, and weird faces that cause your signal to be nowhere near omnidirectional. You will have blobs and dead zones across bands and directions caused by each decision you made mounting the antenna wire. In a practical sense, you’ll spike well on particular bands and directions - like 20m facing due west - and have dead zones on others - silence on 15m due east. You can go into your attic and adjust the antenna to try to normalize operations across bands, but again - just buy an outdoor antenna if you care. Consider the unique bends and folds as a fun challenge to work around and your own personal little hill to climb.
For me, this unique setup plus my location and position in a valley means that East Coast and Western European operations are very unpredictable. Reaching Africa and SE Asia beyond Japan is nearly impossible. But I can easily and reliably reach the Western US, Eastern Europe, Asiatic Russia, and Japan with no effort. South America is hit or miss depending on direction and band - the Caribbean islands are easy to hit, while Mexico is absurdly hard. This makes it all the more rewarding when you finally get a contact.
Part 3 is all about the craft - making calls, logging contacts, and using software designed for 1986!